Steel

My steel choice and heat treatments have evolved now so all my options offer the same level of hardness and edge performance.
All edge steels now are in the 64/65hrc hardness range. The aims of my heat treatment are
- to make the steel as tough as possible at this extreme hardness, by ensuring all the carbides from the carbon and present alloys are as small and evenly dispersed as possible, this is so the steel will be very hard to chip accidentally.
- The steel will not distort at all on a very thin edge. This point is often wildly overlooked by western makers, very fine carbide steels are often very tough, this means on a thin edge unless you use them right up to their stable limit, they will distort rather than chip or distort at the edges when they chip. This effectively water more material then microchipping, as the edge will continually distort if you make it too thin.
- For the same reasons of demanding high hardness that is very nice to sharpen still I favour carbon steels. There are stainless steels that are capable of very high hardness, but they are very heavily alloyed, very wear resistant and horrible to sharpen! When I do use stainless steels I favour fine carbide steels which were designed for cutting tools, like AEB-L or 14c28n, while they don't offer the hardness I usually demand they have a decent combination of hardness, nice edge characteristics and very nice sharpen ability.
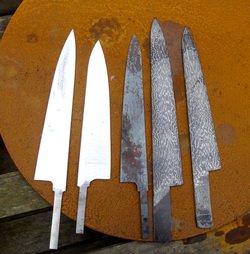
These are the steels I have come to know and love.
Mono Steel - 01 carbon steel - With a very special heat treatment I have developed just for this steel, only for the purpose of making kitchen knives I am able to produce very high hardness 64/65hrc with very little loss in toughness.
San mai - I use the excellent carbon steel 1.2442, This steel is a bit like a love child between Blue 1 and Super Blue - It is a very high carbon , tungsten based steel, capable of very high hardness while being very resistant to chipping. It is a little more toothy than 01 which can be great in a chef knife.
Double high carbon edge steel in damascus. No matter what I have used in the damascus, high nickel etc, there is always a double high carbon mixture on the edge of the knife in a high layer count. In some ways damascus is just for show, but in the case of this combination together they allow extreme high hardness without becoming brittle or unstable as they structurally support each other! Combine this with the natural slightly toothy wear characteristics of damascus and you have performance which feels truly special.
All edge steels now are in the 64/65hrc hardness range. The aims of my heat treatment are
- to make the steel as tough as possible at this extreme hardness, by ensuring all the carbides from the carbon and present alloys are as small and evenly dispersed as possible, this is so the steel will be very hard to chip accidentally.
- The steel will not distort at all on a very thin edge. This point is often wildly overlooked by western makers, very fine carbide steels are often very tough, this means on a thin edge unless you use them right up to their stable limit, they will distort rather than chip or distort at the edges when they chip. This effectively water more material then microchipping, as the edge will continually distort if you make it too thin.
- For the same reasons of demanding high hardness that is very nice to sharpen still I favour carbon steels. There are stainless steels that are capable of very high hardness, but they are very heavily alloyed, very wear resistant and horrible to sharpen! When I do use stainless steels I favour fine carbide steels which were designed for cutting tools, like AEB-L or 14c28n, while they don't offer the hardness I usually demand they have a decent combination of hardness, nice edge characteristics and very nice sharpen ability.
These are the steels I have come to know and love.
Mono Steel - 01 carbon steel - With a very special heat treatment I have developed just for this steel, only for the purpose of making kitchen knives I am able to produce very high hardness 64/65hrc with very little loss in toughness.
San mai - I use the excellent carbon steel 1.2442, This steel is a bit like a love child between Blue 1 and Super Blue - It is a very high carbon , tungsten based steel, capable of very high hardness while being very resistant to chipping. It is a little more toothy than 01 which can be great in a chef knife.
Double high carbon edge steel in damascus. No matter what I have used in the damascus, high nickel etc, there is always a double high carbon mixture on the edge of the knife in a high layer count. In some ways damascus is just for show, but in the case of this combination together they allow extreme high hardness without becoming brittle or unstable as they structurally support each other! Combine this with the natural slightly toothy wear characteristics of damascus and you have performance which feels truly special.
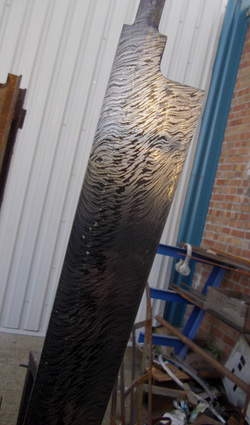
Forging process
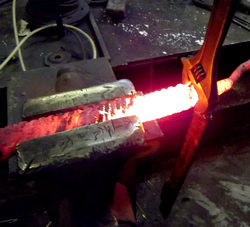
Materials are layered to make up the appropriate blade composition and diffusion bonding or forge welding makes them into one. This is done with appropriate heat/time and a power hammer/hydraulic press to “make” the weld.
Complex Damascus patterns are folded many times and manipulated to achieve a given pattern. This is a very time consuming process, which makes Damascus a somewhat more expensive and sought after material.
The result of this process is a billet or block or layered material, which can be shaped to suit the blade.
Shaping the blade profile and distal taper.
I rough shape my blades by the process of hot forging. The distal taper and tang are drawn from the blank using a power hammer, whilst the profile and tip are shaped and trued by hand. The forging process can be quite accurate, meaning less expensive metal is wasted in the grinding process.
The blade is carefully stress relieved after the forging process by heat cycling to help reduce grain size. The blade is picked clean of oxides the profile is trued and faces ground to clean metal.
The blade is carefully stress relieved after the forging process by heat cycling to help reduce grain size. The blade is picked clean of oxides the profile is trued and faces ground to clean metal.
Heat treatment.
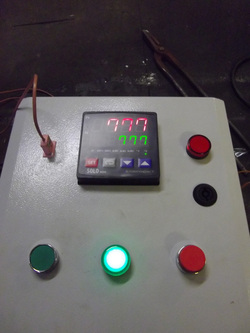
Heat treatment is entirely dependant on the steels used and the result of previous test data I have collected. In the case of carbon Damascus, the blade is first normalized, by heat cycling. This both helps reduce grain size in the steel and helps to prevent the blade from warping upon quenching. This step is repeated at least 3 times.
The blade is then heated and soaked at its critical hardening temperature, this is done using a purpose built digitally controlled furnace to assure accurate results and repeatability.
The blade is quenched is oil or brine, checked for straightness. Hardness readings are then confirmed in a Rockwell hardness testing machine.
Some materials benefit from a further “cryo-quench” in liquid Nitrogen.
The blade is then triple tempered by heating to the correct temperature to relieve the blade to target hardness.
The Grind
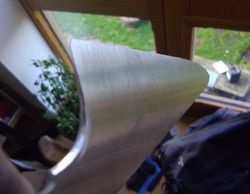
The aim of the grind is to produce a blade which is as thin behind the edge as possible, with enough convexity to the faces of the blade to prevent food sticking. If there is too much convexity however the blade will wedge and show resistance. The right amount of convexity not only stops the blade sticking as it is pushed into food but gives good release when you lift the knife ready for the next cut.
I started in kitchen knives making very thin blades believing that this would give performance. I now favor a more sturdy blade and realize it is the thinness behind the edge that is important. I also give my blades a pronounced distal taper. For example, a blade measuring 3 mm over the heel at the spine will taper to 0.8 mm an inch behind the tip. The bevels will be convex in nature and I will leave around 0.1 mm on the edge to put on my final bevel.
I started in kitchen knives making very thin blades believing that this would give performance. I now favor a more sturdy blade and realize it is the thinness behind the edge that is important. I also give my blades a pronounced distal taper. For example, a blade measuring 3 mm over the heel at the spine will taper to 0.8 mm an inch behind the tip. The bevels will be convex in nature and I will leave around 0.1 mm on the edge to put on my final bevel.
Performance testing on food.
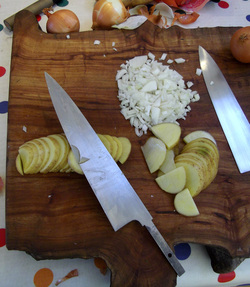
Grinding the knife as thin as possible in the right places with a good balance of convexity can be a tricky balance. Therefore once a knife is rough ground I always sharpen it and test it on food so I can be sure it will perform as intended. I check that there is little resistance at the tip going through onion and I check that there is reasonable food release towards the heel for sticky food like potato.
Putting a bevel on the knife and honing it at this point also allows me to double check that every part of the edge is hard and with no flaws or cracks and it helps me see any small inaccuracies of the grind.
With the information I gain from testing, I can then finish the knife with any necessary changes in mind.
The Handle
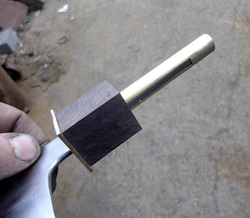
For my knives I am making Japanese influenced "Wa" handles. Only my build process is slightly different. I assemble the parts of the handle on a slotted dowel. This whilst giving a great deal of strength also allows me to control the balance of the knife, without making the handle itself huge. For a large heavy knife I would use a brass dowel to bring the balance back near the choil or heel. On customs the balance point is up to the end user.
I generally use African black-wood for ferrule material and an attractive stabilized wood block for the main handle part. I have a few different styles to choose from and pretty much any combination of materials is possible.
In handles I use, damascus, stainless steel, copper, brass, bronze, fiberous coloured spacers, mammoth tooth and stabilized woods.
I use a high grade marine epoxy system for assembly as I don't trust off the shelf adhesives .
Blade finishing and etching.
The blade is then taken to a higher grit finish on the belt sander, having already put an edge and tested the blade on food I make any tweaks at this point, ensuring it is thin enough at the edge and tip whilst being convex enough to part food nicely.
Hand finishing with abrasive papers follows finishing with an even 600 grit finish. The trick is to finish with all the grit marks running as parallel as possible to the blade.
The blade is then cleaned up and my logo is electrically etched into the metal, using a custom stencil.
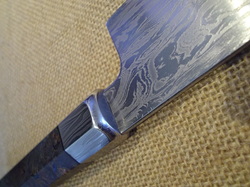
In the case of damascus or san mai I will then etch the blade to reveal the pattern or weld line. I use a mild acid for this, the type of which depending on the steels used. The blackened logo is filled with an acid blocker which can later be removed.
As the photo shows the damascus comes out of the acid with black oxides on the less acid resistant metal. The shiny metal contains nickel and resists the etch. I personally remove all oxides and polish the high points of the damascus to a near mirror finish with micro mesh, sometimes I buff the damascus as a last step on a polishing machine, this depends on the pattern. I favor a light etch, which you can only just feel present with your nail and a more subtle polished look to the pattern. Many makers go with a very deep etch and a more black/silver look. This is generally personal preference, but I do fins a lighter etch prettier in person and easier to maintain. Although it is harder to photograph!
Hand finishing with abrasive papers follows finishing with an even 600 grit finish. The trick is to finish with all the grit marks running as parallel as possible to the blade.
The blade is then cleaned up and my logo is electrically etched into the metal, using a custom stencil.
In the case of damascus or san mai I will then etch the blade to reveal the pattern or weld line. I use a mild acid for this, the type of which depending on the steels used. The blackened logo is filled with an acid blocker which can later be removed.
As the photo shows the damascus comes out of the acid with black oxides on the less acid resistant metal. The shiny metal contains nickel and resists the etch. I personally remove all oxides and polish the high points of the damascus to a near mirror finish with micro mesh, sometimes I buff the damascus as a last step on a polishing machine, this depends on the pattern. I favor a light etch, which you can only just feel present with your nail and a more subtle polished look to the pattern. Many makers go with a very deep etch and a more black/silver look. This is generally personal preference, but I do fins a lighter etch prettier in person and easier to maintain. Although it is harder to photograph!
Blade and handle fit up
The fit of of the tang in the handle is checked after hand finishing and prior to etching also the straightness of the blade in relation to the handle and a square fit at the shoulder of the tang. After which the handle is shaped and taken to a high polish, if there are damascus parts in the handle these must also be etched with the methods described above. With both parts now finished the tang is set into the handle with a high grade epoxy. I use a faster setting epoxy for this process as I find it beneficial to making sure everything stays straight and square.
I have tried to remove one of my handles in a practice piece to see what it would take to remove. I boiled the handle in water to try to loosen the epoxy. This did not work so I roasted it in the oven at 150 degrees c. This spit the main handle block but I still could not remove the handle. In the end I had to cut the handle from the tang in pieces. I would conclude that this method is more than strong enough for even the most industrial kitchen use.
Although putting any good kitchen knife in a dish washer is a strict no no!
Those final touches and of course sharpening the finished Knife.
After ensuring that the overall fit and finish are up to standard. I sharpen the knife. For this is use japanese water stones, there are many to choose from. Here is my chosen line up from the course end to set a flat and even bevel to start with, through to the polishers.
Naniwa chosera 400 grit
Naniwa chosera 1000 grit
Naniwa chosera 5000 grit
Sigma select 13,000 grit
I finish on bare leather after such a high grit finish, for working touch ups I use course leather with a polishing compound.
The stones I have chosen to work with are expensive. But very hard wearing and fast cutting, perfect for my everyday needs. They are all ceramic water stones.
There are many cheaper stones which will do the job, but these will require flatting very often as they are softer and will not last as long. I use a large diamond plate to keep my stones flat before every use.
After that some satisfying tests of sharpness are carried out as well as a final test on food, one last strop, then the knife is given a thin coat of mineral oil, and safely packaged ready to be sent to its new loving home.